Mary Nasser, a very talented artist friend, has created this amazing "Compass" stencil for Stencil Girl Stencils and to celebrate with her she invited me to participate in her blog hop.
As the inventor of the Wood Icing I thought it would be best to use the Wood Icing Textura Paste to showcase how easy it is to create the appearance of carved wood with a simple overlay stencil. If you have never seen or heard of Wood Icing this is just the tip of the iceberg for our super versatile product. We have so much more in store to share with you at www.woodicing.com.
I decided to makeover an unfinished wood frame. We use these frames in our Wood Icing Studio in some of our workshops for beginners. They are something everyone enjoys working with and they allow the students to learn the techniques while creating something that fits their personal style.
I spray a little repositionable adhesive on the back of my stencil to keep it in place.
Spread the paste evenly over the top of the stencil. The thickness will depend on how high you want your raised relief to be. For the more detailed and intricate cut stencils you will need to spread the paste a little thinner to avoid the paste coming up when the stencil is lifted off.
Remove the stencil immediately after spreading the paste over the top. Allow the paste to dry. Drying time depends on the humidity and how thick the paste is applied. You can speed up things with a hair dryer.
Sand all the bumps and harsh edges with a higher grit sandpaper (160). Take care not to create scratches which will show up later when the glazing color is applied.
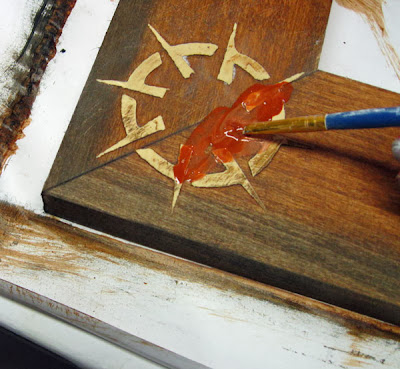
Using our Wood Icing Glazing Color "Mud Pie" brush it on all over in a generous amount. Blot away the excess without removing too much. Our glazing colors are semi-transparent, unlike semi-opaque stains, allowing the wood gran to show through more readily.
Use a dry brush to manipulate the glazing color for the desired shade. Keep in mind when working with unfinished wood, you will want to see the wood grain showing through.
While the Glazing Color "Mud Pie" is still wet apply a thin line of Wood Icing Glazing Color "Licorice".
Blot back the excess "Licorice" glazing color then blend with a soft cloth to create a shaded effect.
Once you have your shading perfected on the entire frame, and in order to apply a lighter shade to the raised relief, sand the glazing color off the top edge of the raised relief.
Apply Wood Icing Glazing Color "Rusty Nails" using the same method of a generous amount of glazing color, then blot back the excess color. Dry brush to the desired shade.
Once you have the Wood Icing Glazing Color "Rusty Nails" shaded then add some depth using the Wood Icing Glazing Color "Licorice".
Allow everything to dry then apply the Wood Icing PolyAcrylic Top Coat. We have three choices Dull, Satin and Gloss. I have used the Satin for this project.
What do you think? Doesn't this photo of Mary Nasser look pretty inside this frame embellished with her "Compass" stencil?
Thank you Mary for inviting me to participate in your blog hop. I enjoyed my journey with this project and I love the "Compass" stencil you have created. I cannot wait to try more of your creative stencil designs.
To see the beautiful and inspiring work of Mary Nasser please visit http://www.marycnasser.com/
*Mary Beth Shaw is a distributor of the Wood Icing product 8oz. Textura Paste. Please visit http://stencilgirlproducts.com/ for more information.
.


