Friday, April 27, 2018

Pretty In Pink Wardrobe


 Close 

Door Pulls


This is Where We Started
I drove into the parking lot of our store one morning and there this beauty was just glowing in the morning sun. I wish I knew the contact info for the guy that dropped it off so I could show him how cute this turned out. 
I think this would be adorable for a little princess room. In fact, if my five year old grand daughter had the space in her room, I would give it to her for storing all those cute little princess dresses she loves to wear.  


I knew right away this was going to be perfect for these adorable shoes as the door pulls.  I have been saving them for just the right piece of furniture.  They are actually Christmas ornaments I had picked up at the World Market a few years ago.  They are made of some kind of composite.  We just drilled a hole right through the bottom of the soles. 


Here are the steps for this finish.
I sanded and primed with a bonding primer. Any good bonding primer will work. What ever you use should have a dull finish or you can paint over the primer with a dull finish paint.  The Textura Paste is easier to use over a dull finish. It tends to slide away as you are spreading the paste on the shiny surfaces.  


First tape off the border with 1/4 inch tape.  This will make it 
easier to create a straight and clean edge, which will give a 
more professional finish. 


Trowel a thin coat of Textura Paste over, making sure you have good coverage.

 Immediately roll a damp long nap paint roller to create the texture. 


While the Textura Paste is still wet, remove the tape.

Allow this section to dry. The dry time could take one or two hours depending on the humidity.  You can speed the drying time up with a fan or a hair dryer. 

Begin applying the Periwinkle Stencil design on the frame and allow this to dry. 

After the Textura Paste has dried, use the knife to slice through the spaces between the joints.  It is best to do this while the Textura Paste is still wet.

If you can get a piece of sandpaper in between the cracks then sand it a bit to get a smooth straight edge. 

These details are what will set your work apart from the amateurs.  


A closer look at how much better it looks to clean up the edges.  

However, if your piece does not have a separation at the joints then you may not need to be concerned about this. 
 

Each piece will present a situation that will require a little thought and ingenuity.


Sand the Textura Paste in the center panels and remove the dust.


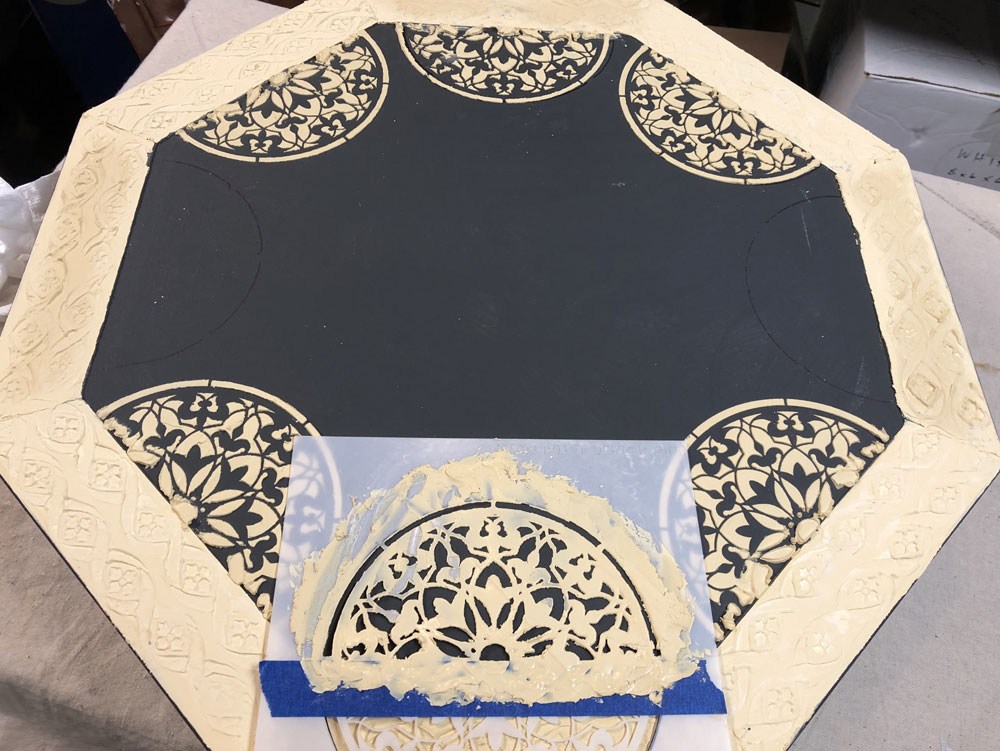
Add the Buttercup Stencil to the center panels.

Allow these to dry.  Sand, then paint.  You may want to allow the Textura Paste to dry overnight if you have the time.  Less chance of making the raised relief too soft with the wet paint. 


We painted with Miss Mustard Seed's Milk Paint, Arabesque Color.
I mixed 2 parts color, 2 parts water and 1 part Bonding Agent.
Once the pink was dry.  I dry brushed over the pink with Miss Mustard Seed's Milk Paint, Farm House White to bring out the texture. 

Here is a close up with the details. 

Thank you so much for visiting my blog.  I hope to always bring finishes to you with our Wood Icing product that will inspire you.  
I hope you will find it will take your finishes to the next level.  
For sure, it can be intimidating until you take the leap and give it a try.  Even if it is to add a little embellishment to your piece, such as a drawer front or a little texture here and there. Just get your feet wet with a box or picture frame.  I promise, you will be addicted in no time.  
Please visit woodicing.com    
Type in or copy and paste PinkHero in the coupon box.  
Hit the apply button to activate a 15% Discount until May 31, 2018

Sincerely,  
Rose Wilde


Monday, April 16, 2018

Anthropologie Table Top Hack


Before the Hack

Anthropologie Original 
Embossed Meridian Coffee Table $798


After the Hack


Where to start

Paint the entire top with the black paint and allow that to dry. Tape off the sections with blue painters tape.  Mark every other section with a piece of tape in order to keep straight on where to apply the Textura Paste next.
  
Apply the stamped and raised design in every other section, which allows the Textura Paste to dry enough to apply the next section with out disturbing the design.  By the time you go back to do the remaining sections the first sections will have set up enough to work right next to them with out messing up the stamped design.

     Spread the Textura Paste with our Offset Knife.  

Spray the paste with a fine mist of water.

Spraying the Textura Paste prior to pressing in the clear stamp prevents the paste from coming off when you lift off the stamp.  
I pressed two rows of the stamp for my border design.


After I have my border stamped all the way around, I begin placing the Stencil at each section and spread the Textura Paste over the top Immediately lift the stencil off.  As you can see, I only used half of the round stencil.

Allow this to dry completely.  I normally allow my Textura Paste dry overnight, so it can be sanded and painted without doing any damage to the design.  Textura is extremely durable once it is allowed to dry completely. 

 Use 100 grit sandpaper or sanding block to smooth over the lumps   or bumps and to remove any loose particles. 


After sanding, paint the raised design with Modern Masters Metallic Collection Acrylic Water Based Olympic Gold.

After the gold paint is dry apply the "Licorice"
Wood Icing®  Furniture Glazing Color 

Wipe away the excess Licorice Glazing Color to highlight the gold and allow the dark glaze to fall into the crevasses which will give more definition to the raised pattern.

If you feel the Licorice Glaze is still too dark then go back with a light application of the gold paint and dry brush over the top of the design to give even  more definition.


                                         The Final Finish 
  How did we do?


Supply List:
Royal Design Studio Amira Ornament Craft Stencil 
Wood Icing Off Set Knife
Wood Icing Textura Paste 
Blue Painters Tape
100 Grit sand paper or sanding block
Annie Sloan Chalk Paint® Graphite 
or any brand of black paint (Prep may be required)
Modern Master's Gold Metallic Paint Collection
Wood Icing Top Coat Poly-Acrylic Satin 

*Amount of Textura Paste used for this project. We used one 8 oz container for this table with zero left.  We recommend ordering a little extra for practice.  

Purchase Wood Icing®  Products 
Find a Wood Icing®  Retailer near you. 


Tuesday, May 16, 2017

Inlaid Beaded Edging with a Fresco Finish

 Fresco Finish with a "Faux" Beaded Edge


This is the "Before" cabinet.  I was not happy with the louvered doors so I created a raised panel with a beaded edge. Read further to learn how this was done.

Base Coat with a bonding gray paint .

I removed the doors and painted the inside of the cabinet white.


For the table top, apply a generous coating of a bonding gray paint. 

Before the paint drys, roll a textured roller across the top to create a textured finish.  The roller will pull off the paint leaving the design. Allow this layer to dry.

As you can see I was not exactly careful with this design.  You can choose to be "Free Form" or more "Precise" with your designs when using these rollers.  The are incredibly fun to easy to use. 

I did not want the louvered doors for the front of this cabinet. 
So we cut out two panels to cover the louvers.  

We glued down the panels with contact cement. 

We set the panels in place, then weighed them down with some heavy objects on top to secure a good adhesion.  We let this dry overnight.

To create the beaded border, place tape 1/4 inch away from the edge of the panelWe also drilled a hole in the middle of the panel to attach a door pull.  We felt this would help to secure the door panel. 
Close up of the 1/4" border for the panels

These inexpensive plastic beads are what I use for the "Faux" Beaded Edging of the cabinet doors. can be purchased at any hobby or craft store.  they come in various sized beads and length.  
I found these at Hobby Lobby in the craft section for doll making.

Place a line of Wood Icing - Textura Paste on the edge of the panels.  Wet your fingers in water to smooth the paste over.

Press the plastic pearls into the line of Textura Paste. 

 Smooth a fingertip of Textura over the top of the pearls so they are secured into the Textura Paste.

Remove the tape immediately, before the Textura Paste has a chance to dry. If you wait too long to remove the tape it could cause the Textura Paste to crumble along the edge.   

*But, if you do wait too long to remove the tape, then allow the Textura Paste to dry completely before you remove the tape.  It will be easier to achieve a clean edge.  


 Randomly apply sections or blobs of Textura Paste to the framed edges of the cabinet doors. Do one section at a time.


While the Textura Paste is still wet, roll a wet textured roller into the paste. The roller will work best if it is wet, just spray water onto the roller before rolling across the paste. which prevents the Textura Paste from lifting off with the roller. 

*This will not be a perfect application due to the size of the frame and roller being used. However, the bits of texture, created with the roller, works very will with this finish. 

Allow the Textura Paste to dry thoroughly.  Overnight is best, but if pressed for time it can be dried with a fan or hair dryer.
Once dry, sand over the top to remove lumps, bumps and loose particles.

Once the cabinet doors have dried and have been sanded over, remove the dust and paint the entire surface with gray paint.

Once the paint was dry, I decoupaged colorful napkins all around the bottom half, including the cabinet doors.

Once again, apply sections or blobs of the Textura Paste over the painted and decoupaged areas. Drag and smooth over these random blobs with the offset knife to thin down and spread out the paste evenly. Work quickly and work a section at a time.

While the Textura Paste is still wet, immediately roll the "wet" textured roller across the top of the paste for a random design. 
It may be necessary to rinse the Textura Paste off the roller occasionally.  I keep a bucket of water close by when doing this.

Allow the textured design to dry completely.  Once dry, sand over the top of the texture to remove any lumps bumps or loose particles.  Remove the dust.

Apply our Wood Icing® Furniture Glazing Color, Tree Bark over the tabletop.  Immediately remove the glaze with a soft rag.  
If the glaze dries too fast or will not move for you, use a wet rag.

Immediately remove the "Tree Bark" color, glaze with a soft rag. 

If the glaze dries too fast or will not move for you, use a wet rag. Or, for a longer open time, you can use our Clear, 
Wood Icing® Furniture Glaze to remove the dark glaze coloring.
Just brush a small amount of the clear glaze over the top and the dark color will begin to work up again so you can manipulate 
how dark you want the glaze to be or how much you want to wipe back off.

Apply the Wood Icing Furniture Glazing Color "Tree Bark".

Immediately apply color remove with a soft rag.  
Do one side at a time.

Apply and remove the Furniture Glazing Color to the painted bottom of the cabinet to create a distressed aged effect.

Once the Glazing color has been wiped back and is dry. Apply a small amount of gray paint on a paper plate. Dip the tip of your brush into the paint, then offload most of the paint by wiping with a paper towel.  Dry Brush over the top of the textured surface, which will leave bits of Paris Grey on the top surface to accent the textured design.

Close ups of the finished cabinet door.


Thank you for taking the time to read my blog.
Rose Wilde of Wood Icing Company. 


Supply List


Any Brand of Gray Paint with bonding
properties.  Flat or Semi-Flat .


Decorative Art Rollers


Soft clean rags
Sand paper (low to medium grit)

Thank You! for reading my blog.

Please visit Woodicing.com

or
To find a Wood Icing® Retailer near you