Thursday, December 12, 2013

Lingerie Closet

I found this amazing lingerie closet in a little resale shop just a mile from my house.  I have never seen a piece shaped like this one.  I knew I had to have it and I knew whatever Wood Icing™ finish I used on it would have to be worthy of this exceptional piece.  Therefore it sat around in the studio quite sometime before I could get the nerve to touch it,  There was lots of anticipation as to what I was going to do  from customers and students visiting the store. Thanks to some of my very talented friends making a few suggestions, I worked up the nerve to get started on it.  My friend Kathy Otto loaned me her gorgeous custom stencil and my friends Tim Glasteter and Mark Tillman offered the suggestion on the partial use of the stencil and the placement of it

I could swear I took a before photo of this but I cannot seem to locate it in any of my files. So what you see here is the beginning of the application of Wood Icing™ troweled through a stencil. I broke out the stencil and only used portions of it to embellish particular areas.  I used the basket of flowers across the two drawers on the bottom, then used the scrolls on the top half of the door. On the sides you are looking a raised relief with the use of lace.

The sides and inside drawer fronts just screamed for a lace design to accentuate the lovely curves.  A stencil would have been extremely difficult to execute inside these inset areas.  I could choose to spread the Textura Paste on first, then press the lace in or I could lay the lace down then trowel the Textura Paste over the top of the lace, then pull the lace out.  Since I wanted a really high relief I chose to lay the lace down then trowel the paste over the top of the lace.  I pull the lace off right away. 
Here is a little photo demo on how this is done.  (this is not the lingerie closet in the demo but another project done with the same technique,)  
1. Paint with any brand of flat or semi flat paint with good bonding 
qualities or prep with a bonding primer before painting.

2. Lay down lace

3 Trowel Textura Paste over the top.

4 Remove the lace immediately. While the paste is still wet..


This is where I will admit I had a mini breakdown while trying to attempt to apply the lace on this vertical surface. So, I will share with you what I learned from that experience.  I tacked three or four small brads inside the top of the panel.   I then hung the lace on these brads so the lace would be held in place for me while I did my magic with the Textura Paste and lace.  Normally this technique works like a charm. ..read further

Unfortunately, it did not this time.  I would spread the paste on then pull it off and big chunks of the paste would come off with the lace,.  I think I did this about four times before realizing that the problem was, the surface is too slick to hang onto the paste.  So I started over again.  But first I applied a coat of a soft warm white flat or semi paint. which has the perfect texture to allow the Textura Paste to grab onto the surface and I never worry about failure.  Some paints have too slick of a finish that causes the paste to slide during application so look for a good bonding flat to semi flat paint. Ideally, it would be best to apply a bonding primer before the flat or semi flat paint.

Once I crossed that hurtle I was on my way to finishing this project.  Unfortunately, I never have more than and hour here and there to work on something like this, so it sat around partially done for quite some time.  I think I got on a few peoples last nerve for taking so long on this one.

I chose to paint it with the color "CoCo" color and embellish the raised reliefs with "Light Blue" paint. It is breath taking.  I know these photos do not show just how beautiful this piece really is, but I love this piece so much that I may just have to keep it for myself.  Maybe someday I will get some professional photos done of it so I can share the real beauty of it with you.

Wednesday, October 2, 2013

Wood Icing/Compass Stencil Project


Mary Nasser, a very talented artist friend, has created this amazing "Compass" stencil for Stencil Girl Stencils and to celebrate with her she invited me to participate in her blog hop. 
 
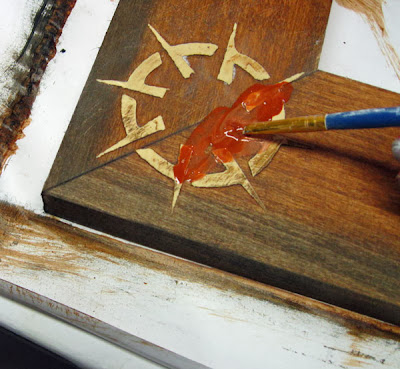
As the inventor of  the Wood Icing I thought it would be best to use the Wood Icing Textura Paste to showcase how easy it is to create the appearance of carved wood with a simple overlay stencil.  If you have never seen or heard of Wood Icing this is just the tip of the iceberg for our super versatile product.  We have so much more in store to share with you at www.woodicing.com

I decided to makeover an unfinished wood frame.  We use these frames in our Wood Icing Studio in some of our workshops for beginners.  They are something everyone enjoys working with and they allow the students to learn the techniques while creating something that fits their personal style.
 
I spray a little repositionable adhesive on the back  of my stencil to keep it in place.
 
Spread the paste evenly over the top of the stencil.  The thickness will depend on how high you want your raised relief to be.  For the more detailed and intricate cut stencils you will need to spread the paste a little thinner to avoid the paste coming up when the stencil is lifted off.
 
Remove the stencil immediately after spreading the paste over the top. Allow the paste to dry.  Drying time depends on the humidity and how thick the paste is applied. You can speed up things with a hair dryer.
 
Sand all the bumps and harsh edges with a higher grit sandpaper (160). Take care not to create scratches which will show up later when the glazing color is applied.
 
Using our Wood Icing Glazing Color "Mud Pie" brush it on all over in a generous amount.  Blot away the excess without removing too much.  Our glazing colors are semi-transparent, unlike semi-opaque stains, allowing the wood gran to show through more readily.
 
Use a dry brush to manipulate the glazing color for the desired shade. Keep in mind when working with unfinished wood, you will want to see the wood grain showing through.
 
While the Glazing Color "Mud Pie" is still wet apply a thin line of Wood Icing Glazing Color "Licorice".
 
Blot back the excess "Licorice" glazing color then blend with a soft cloth to create a shaded effect.

Once you have your shading perfected on the entire frame, and in order to apply a lighter shade to the raised relief, sand the glazing color off the top edge of the raised relief.
 
Apply Wood Icing Glazing Color "Rusty Nails" using the same method of a generous amount of glazing color, then blot back the excess color. Dry brush to the desired shade.
 
Once you have the Wood Icing Glazing Color "Rusty Nails" shaded then add some depth using the Wood Icing Glazing Color "Licorice". 
 
Allow everything to dry then apply the Wood Icing PolyAcrylic Top Coat.  We have three choices Dull, Satin and Gloss.  I have used the Satin for this project.
 
What do you think?  Doesn't this photo of Mary Nasser look pretty inside this frame embellished with her "Compass" stencil? 
 
Thank you Mary for inviting me to participate in your blog hop. I enjoyed my journey with this project and I love the "Compass" stencil you have created.  I cannot wait to try more of your creative stencil designs.
 
To see the beautiful and inspiring work of Mary Nasser please visit http://www.marycnasser.com/ 
 
*Mary Beth Shaw is a distributor of the Wood Icing product 8oz. Textura Paste. Please visit http://stencilgirlproducts.com/ for more information.


.


Sunday, September 1, 2013

Refurbished for an Industrial Decor Finish


I found these photos in a file on my computer and thought I would share the process with you. A few years ago I found this old trunk at a flea market for $30. It had great bones with a beautiful cedar lining.  I knew it was a great Wood Icing project and I just couldn't pass it up.  At the time I found this piece, I was really into the metallic and industrial designs.  I loved the challenge of taking something old fashioned and changing it to fit into the loft/industrial décor. 


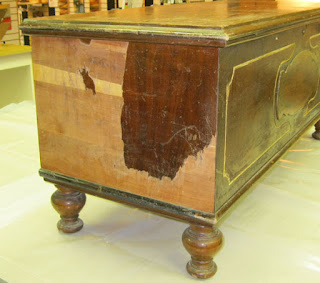
Most of my projects require a few repairs, usually the veneers and minor broken pieces and this project was no exception.  There was a crack all the way across the top of the lid, which broke right off and fell on the floor while I was preparing the surface.  This caused a delay in progress because I had to call on my handy dandy husband to put it back together for me.  Since I have the patience of a gnat, I feel he is a little slow to the finish line but once he gets done with a repair it is nice and solid and good forever. 

This area had to be filled in with Textura Paste and smoother over.  I allowed this layer to dry. Then sanded smooth before I applied the checkered design for the metallic finish. 

I removed the raised pieces off the front with a chisel and hammer which caused more damage to the veneer.   But of course that is never an issue with an open bucket of Textura Paste around, just fill and sand smooth.  Now I have a clean palette to go with. 


I am in love with foils and texture together.  First thing I did was create my design of large squares of plastic canvass, custom cut in the exact size to achieve a checkerboard finish  I then spread the Textura Paste over the entire surface (one side at a time)  then pressed in a square of the plastic canvass  into the paste, leaving every other space smooth. 

Once I had allowed it to dry overnight, I sanded it smooth, removing all the boogers and cleaning up the edges. I then stained it with a dark color comparable to our Wood Icing Furniture Glazing Color (Tree Bark mixed with Licorice).  I allowed the glaze to dry completely.

Wood Icing Glazing Colors  click here to purchase


Next was the addition of the metallic silver foil and a clear glossy top coat, comparable to our Wood Icing PolyAcrylic Gloss top coat. The goal was to create a finish  inspired by the look of mercury glass.

We raffled this trunk off during one of our events in our Wood Icing Gallery a couple of years ago.  All proceeds went to Breast Cancer Research.  I would love to get my hands on another trunk like this and do this finish again.  If I just keep my eyes open I feel it will appear on the horizon sometime again for me.

Join me in a workshop, if this finish intrigues you and you would like to learn this and more metallic finishes for furniture and cabinetry  Tuesday, September 10, 10am – 2pm  (lunch included) for $159.
You will create the following finishes
one metallic finish with texture using foils for a rustic finish
one metallic finish with texture using foils for a contemporary finish
one metallic finish using Iron & Rust activator
one metallic finish using Brass or Copper along with the Patina activators
Call the Wood Icing Gallery at 636-536-0409 to register.


Friday, April 19, 2013

The Wine Tap Cabinet


I just love all the embellishments this cabinet came with.  And, I am so excited to show off this makeover.  After this cabinet sat around in the studio for longer than I want to admit, I finally found what I wanted to do with it. This was my most fun project to date! 

I had many suggestions for what I should do with this old radio cabinet, (at least that is what I think it used to be).  The suggestion to turn it into a wine cabinet appealed to me the most, but with a twist. 

Heather and I like to serve wine when we have events in our studio, but serving wine from a bottle can be challenging when we are so busy at the event and preserving the half empty bottles at the end of the night is a problem, so we started purchasing boxed wine to make things a little easier.  We place cool packs inside the white wine box to keep the wine chilled. No buckets of ice to mess with. Sooo much easier and I really think the wine tastes fairly good.  Of course, I am apparently not too picky about my wine (what the ever) ....

At one of our events, while serving someone a glass of wine, someone said we should hide the boxes under the counter so our guests wouldn't know we were serving boxed wine. The truth be known, Jack and I keep boxed wine in our pantry.  We actually do enjoy the taste, besides the two of us cannot seem to finish off a bottle by ourselves so it cuts down on the waste as well.

When I decided to turn this cabinet into a wine bar it crossed my mind that maybe I should create a cabinet for my boxed wine to give it a little  class and to make using my boxed wine more convenient and fun.  Here are the results of my idea. 

Thank goodness I have my handy Jack that knows how to hammer and saw like a pro. 
Yes, these wine boxes get hidden inside this beautiful cabinet.

Of course, this was done using Wood Icing™ and Chalk Paint® decorative paint products.
 
Custom color mix of  Chalk Paint® decorative paint colors Florence and Duck Egg
a color wash of Old White, clear soft wax and then embellished with Gold Gilding Wax. 
 
Jack installed these wine glass hangers from the hardware store.

This is the Wood Icing™  "Tooled Leather" finish surrounding the wine box spigot.
 
Now that we are finished with this one I can't wait to make another one. Wonder what I might find in some little re-sale shop for the next one. Stay tuned ....