I have been refurbishing furniture for seventeen years now. However, If I didn't hear it once I heard it a million times that my photos did not do my work justice. I still struggled with this issue for many years. I purchased a really good camera and even tried hiring someone to take professional photos for me. But my problems was the need to do it myself so I could produce "How To's" at a faster pace.
So this past year I joined a group on Facebook called Flipping Furniture for Profit. Rebecca Hansen Groskreutz teaches members how to stage furniture for photos and how to price their pieces to "Make a Profit". It has been a phenomenal group for me. I feel I have learned so much in a short period of time. Still learning but my photos have definitely gone up a few notches.
Rebecca also offers a more intense program called Flipping Furniture University. It has "How To Videos" and lots and lots of great information for painting and selling furniture for profit. Worth every penny.
However, I found my space for taking photos was pretty lame. The only place I have with the guidelines Rebecca sets forth is at my Wood Icing® Co retail store.
So, my first thought was to buy a section of hardwood flooring and set up a staging area at the store But my husband said. Why don't you just paint a fake floor on a thin sheet of pressed board? That way you can move it around and set it up yourself whenever you need it. And I can create more than one color and style. Duh, why didn't I think of that? This is how I did it in one very short afternoon.
Start with painting a 4"X 8" sheet of pressed board
with a warm or very light woody yellow paint color.
I brush on Wood Icing® Furniture Glazing Color
"DiJon" for the first layer of wood grain
After I brush on the DiJon glazing color, I wipe back
the access with a soft paper towel or rag.
I allow this layer to dry, which will only take
about 10 to 20 minutes
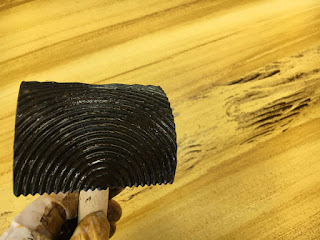
For the next layer I used our Wood Icing® Furniture
Glazing Color, "Tree Bark" and a wood grain tool
There is two ways to apply this technique. For a subtle
application of color you can dip the grain tool into the
glazing color, then lightly drag a dry brush over the
top of that layer to spread and blend the color or...
You can lay the glazing color down with a wide brush
Then drag the grain tool through the glaze, which will
remove some of the glaze to leave the wood grain.
For a variation of color and depth, apply the Wood Icing®,
Tree Bark color in random areas then let that layer dry.
Once I had the "DiJon" and "Tree Bark" glazing colors
applied and I had allowed them to dry. I went over the
entire board with our Wood Icing® Glazing Color
"Really White"and wood grain tool. Apply the glaze
with a wide brush then run the grain tool over the top.
To mark my boards I used a cut board as a template
for 4 inch wood planks at random lengths. Of course,
my usual mode is "just get it done", so I used a Sharpie
to mark random lengths of boards. You may want to make
your lines more authentic looking by using acrylic paints.
I applied Wood Icing® Poly-Acylic "Dull" for protection
Here you see the board finished and in front of my white wall.


Great Job
ReplyDelete